If anyone is thinking about getting into paintless dent removal as a career, you might consider watching this informative video. There are many things to consider beyond just a good pdr school. It generally has to do with your own personality and demeanor.

Posts Tagged ‘PDR Training’
Is Learning PDR Going to Be for You?
May 13, 2011
0
Comments
New Website for Dent Time is Coming Along – Auto Reconditioning
 Dent Time is currently building a live prototype site called www.DentRepairSanDiego.com that will become the official site of DentTime.com Although this domain will remain live, DentTime.com is planning to have a similar site with a bit more goodies.
Myke Toledo who is the President of Dent Time, LLC works on his own websites and thoughtfully plans out a mega information site for his future customers. From high definition educational videos to informative FAQ’s pages that give the visitor all the information they could ever need. Myke Toledo says he wants the visitor to have the choice to read or watch about the services offered. Also inform his future clients why there is a difference between companies and quality. “I have a lot of passion for the auto recon industry and so why not show it”, says Myke Toledo. Myke also states his goal is to have his site become the most interactive site with live video streaming, chat and online training sessions. He’s already been creating pdr training downloads and free videos to view on Youtube.
He doesn’t quite know when he will launch the new site but it’s a matter of feel and being satisfied. “It seems I’m never satisfied and I feel I have a disease. Every time I think I am happy with my work, I think I can do better.”, Myke explains. “That is my biggest problem and sometimes it holds me back.” Myke told us that he has a lot of open projects and in between that, he consults other companies and trains pdr privately to students from all over the world. Training was another motivation for creating a new web site so his future students can actually educate themselves why there is a difference where you get your pdr training and how.
Keep checking out www.DentRepairSanDiego.com for Myke Toledo’s latest updates.
Aug 19, 2009
0
Comments
Dent Time Gives Paintless Dent Repair / Removal Tutorial
Line Board PDR – Paintless Dent Repair Tutorial- 9-3 Saab
 Dent Time expalines and shows a little bit on how they removed a fairly deep baseball dent on the corner of the rear quarter panel. The repair took about 3 hours. As most know, dealing with corner dents there is always a lot of tension around the edges. Pushing the dent from behind first did not work. Nor did it help by knocking down as well.
Starting the Dent
It was only obvious that glue pulling was going to play a factor when it came to removing the dent. Pushing from behind would only force it and cause unwanted push marks and jeopardizing the integrity of the finish. About three pulls later, the dent was only a quarter way removed but there was a price to pay. The clear coat was hair-lining. If the dent was pulled any further, it would have pulled the paint right off. The hair-line fractures were barely noticeable and the repair continued.
Crown Releasing
Knocking down the crowns was much easier since now the pressure was taken off. We never really try to do too much at once. Always keeping our dents balanced is one of our key techniques for a successful dent removal. We use a semi sharp knockdown and carefully work the outside. Unfortunately sometimes and knockdown can cause unwanted tap down pits. Although it can be fixed, it just takes more time in the end to finish. We show this on our video tutorial later.
Pushing the Dent
Finally we were able to use a soft tip tool and work from the outside of the dent towards the middle. Now we had to go back n forth between pushing and knocking down. Lastly, we used a sharper tool to pin point all the mistaps caused by the sharp crowns. Indeed it was tedious but it had to be done. 3 hours later it was completed. Video coming soon..
Jun 22, 2008
0
Comments
How Can you Tell if a Paintless Dent Removal (PDR) Training School offers Poor Quality Training?
This post was created from Marty Runik (TopGunPDRTraining.com) How can you tell if a Paintless Dent Removal Training School offers poor quality training?
Unfortunately, most of the time there is no way to know you have received poor PDR training until about three months AFTER you train. Sometimes it is possible to tell after the first day of training that a school is poorly run. If the staff looks overwhelmed by too many students or just bored, you may want to leave quickly to get as much of your money back as possible. Here are several things to look for in spotting poor quality schools.
1. Insist on one-on-one training from a qualified trainer. This means eight hours a day, every day with the trainer, working with you alone! Many schools define one-on-one training as spending an hour each day with each student. Other schools may give you eight hours a day with a person that is a poor PDR tech and has little training experience. Before paying any deposit ask for a WRITTEN guarantee, including a FULL REFUND INCLUDING YOUR DEPOSIT, that you will receive CONSTANT one-on-one training with the head trainer only and NOT an assistant. If you arrive at a training school and see that you will not get constant one-on-one training, demand ALL your money back including the deposit before the first day of training is complete. Many schools train at least four or more students at a time per instructor. To learn Paintless Dent Repair properly, quality one on one training is a must. In certain situations a maximum of two trainees can be trained simultaneously, but this situation needs to be carefully evaluated by the trainer before any training is done.
2. Ask if the trainer does any dent work or other activities while training. This is a VERY important issue, because many techs are now supplementing their dent or hail business with what they call “PDR training.” Lets be perfectly clear here. A trainers attention should be focused on the student, not other activities period! Many trainers have the student “observe” them for much of the day while the trainer makes money at his route or retail location. Then the trainer has the student practice exercises for a few hours at a shop. While this is very profitable for the trainer, it is a very poor learning environment for the trainee. Many “trainers” will justify this practice by calling it “real world experience”. This is just not true. A student MUST learn the basics thoroughly first, by constant one-on-one work with the trainer. There are many ways a trainer can give a student real world experience, including some observation of the trainer work. But if this exceeds about 3 or 4 hours TOTAL during 2 weeks of training, beware…you are almost certainly being scammed.
3. Does the training school offer advanced training in addition to beginning training, and are techs going there for advanced training? Many working technicians are always seeking to improve their skills. A quality trainer can and will offer this training in addition to basic training, and should have an excellent reputation for doing both. A school that only offers beginning training may do so because no experienced working technician would ever consider that school to advance their skill level. If the school offers advanced training, ask for a referral list of working techs that have gone through their advanced training program and call them.
4. Does the school make their own tools, or have them made by one company? Most all experienced techs will tell you there is no tool company that makes every type of PDR tool well. If you want a true quality set of tools, you should choose from the five or six tool manufacturers that make quality tools. You should ONLY choose your tools from these quality manufacturers during your training, not before. A good trainer will always guide you in the proper selection of your tool set, and will teach you how to recognize the MANY differences between a good quality and poor quality PDR tool. ALWAYS ask to see and keep a copy of the ORIGINAL manufacturers tool invoices at any Paintless Dent Removal Training school that sells tools at the school. Many schools make the tools themselves, or have their tools made in China or Taiwan with a HUGE mark up to the student. .
5. Beware of any Paintless Dent Repair school that tells you learning PDR is easy. This is simply not true. PDR is an art that requires a lot of drive, patience, and proper training to learn. Most standard ways of teaching this art require about a six month learning curve of very diligent practice before starting to repair real world dents. The methods used by TopGun can cut the length of this curve by about half, but the same diligent practice is still needed.
6. Question any company that tells you they can train you from the start in one week to do real world Dents. There is no way this can be done. A bare minimum of 2 weeks of very intensive over-the-shoulder training is needed. Three weeks is ideal when it can be done.
7. You contact a Paintless Dent Repair training school and are barraged by phone calls shortly afterwards. This indicate the school is far more interested in selling you training, than actually training you. Another warning sign may be a salesperson that keeps lowering prices with each follow up contact they make with you, until you agree to train with them. Many of these schools employ trainers that can’t make a living at PDR for one reason or another, and are not gifted teachers. A school that seems to do anything to make the sale should be avoided at all cost..
8. Ask for references from WORKING techs who have attended the school. Some companies employ people who will give them a glowing referral, but have never attended the school, and can’t fix a dent. Beware of testimonials that list names and states only after them. Anyone can make up a testimonial and put it on a website. Testimonials should have the cities and names of businesses after them so they can be verified and checked out.
9. Visit Paintless Dent Repair forums where techs from all over the world gather to discuss PDR related issues. Do searches on these forums about the training school you are interested in and see what techs are saying about them. Probably the best forum for this purpose is at www.doording.com
10. Before signing any contract, ask to speak to the person who will be training you. Get any questions answered directly. If you can not communicate well with the trainer by phone, or your questions are not answered well, chances are you will have the same experience while training.
11. Beware of individual trainers that contact or solicit you. Some people train because they can not find work as PDR techs, especially during a slow hail season. These techs will sometimes hold “fire sales” on training to get people to train with them. This training is almost always inferior, and the student usually doesn’t realize it until months after the training is over.
Mar 10, 2008
0
Comments
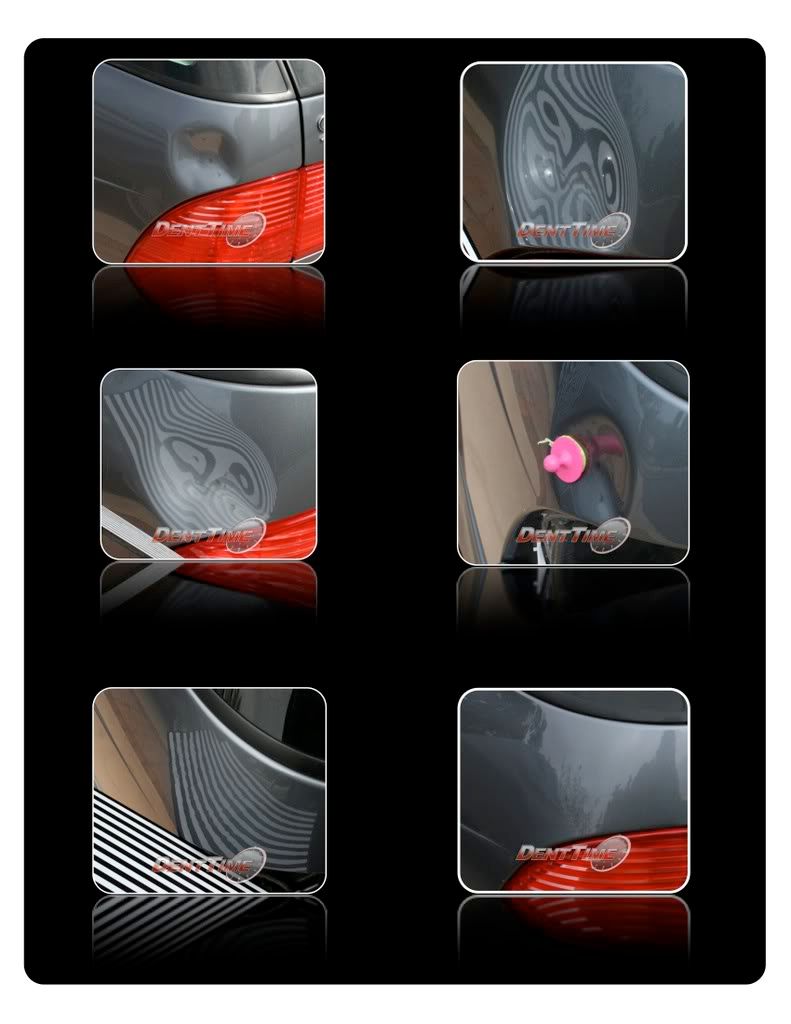
Dent Time – Explains Basic Body Line Paintless Dent Repair Training
Body Line Dent Repair – PDR Paintless Dent Removal Training

Here we have a fairly deep dent on the body line of a 750IL BMW. As you can see when you blow up the photo by clicking on the diagram, you’ll notice the pinched lines above the center of the dent in photo #1. If you don’t release pressure off the crown, you are going to have a real hard time moving the dent.
The #2 photo you’ll notice the lines above the center dent are now straighter. Which indicates pressure has been removed. From here, we’ll work gradually push from top to bottom into the center.
As the we work the dent towards the center, the outside surrounding area will become tighter (Photo #3). We want to knock down the outside to help relieve pressure. This helps the flexibility in the paint so we don’t cause cracking. Now it’s important you are very accurate pushing. A good idea would be to use some type of protection on the tip of your tool like tape or a plastic cover.
#4 photos shows a slight high and a low. You want to keep your dent always clean as possible before you work the center. (Some cases, you can work the center direct but in this case, the dent is too deep for this method) Make sure you switch sides between pushing and knocking down so you can keep your dent balanced and clean.
#5 This photo shows that we are close after repeating steps 3 & 4. Again we are always checking from one side to the other.
#6 The final step. Cross checking is important. Stand up and move your board in all directions to catch any curvature or fade that will indicate your repair. Clean and polish.
Now this is a real basic explanation of our PDR repair. With one on one training, you’ll have a much better understanding and grasp of this technique. For inquiries of PDR Training, please visit the main website. Or visit their official blog by clicking here.
Feb 22, 2008
0
Comments
Under Construction
 Our blog is under construction. We are working hard to bring a better navigation experience. Thank you for your patience.